strip connector

How to connect led lights together

How to Connect LED Light Together Two and Multi LED Strip Lights Together


Led light strips are becoming more and more popular for both indoor and outdoor use. Many people are using them for the room, ceiling, and even bedroom lighting because of their amazing colors. Some people even use multiple led strip lights together to create an amazing effect. However, when we install the led strips, we always need DIY or projects such as connecting two led strips together or even multiple led strip lights together! But don’t worry, it’s not as difficult as it sounds. Here are a few tips on how to connect two led strips together.

Can you cut led light strips?

Yes, That’s right, you can easily cut led light strips only on the line where they are marked!

To begin with, you’ll need to gather a few supplies such as a soldering iron, solder, wire cutter, and heat shrink tubing. Then, you’ll need to cut the two led strips so that they’re the same length. Next, you’ll need to solder the positive and negative wires of each strip together. Be sure to use heat shrink tubing around the connection to prevent shorts. Finally, you can tape or glue the two strips together. That’s it! You’ve now successfully connected two led strips together.

Is there a way to connect led strip lights together?

Can LED strip lights be joined together?

  • Yes, You should choose the version that is cuttable and can be joined together with enough power supply!
  • You can connect led lights together!

If you want to re-connect several LED strips that were already cut before, there’s no need for worry. Simply follow any one of the methods we mentioned below and your task will be completed quickly with ease!

LED strips are often sold as single-color or LED color-changing lamps. If you want to connect two different types of these lights together, make sure they’re both compatible with each other first!

Connecting two LED Strips light from different brands is possible if they are both rated for the same voltage and have a similar layout.

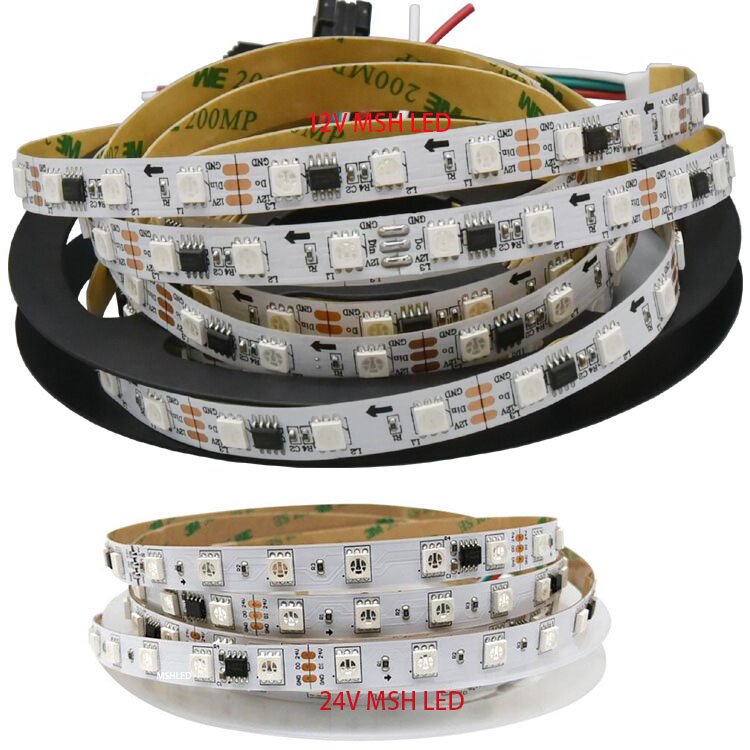
LEDs come in different voltage flavors, so it’s important to know which one you have before connecting them all together. Some strips operate at 5V DC while others can handle 12 volts of power–and there are even higher-voltage options like 24 volts!

How to Connect Two LED Light Strips Together, Step by Step

How to Connect Multiple LED Strip Lights Together

1) Measure the length of the LED strip lights you want and mark the cut position.

2) Cut the LED strip lights at the marked position using a sharp knife or scissors.

3) Calculate the voltage and power for the desired LED strip light length.

4) Make sure you are using the correct adapter to avoid voltage decrease.

5) There are two ways to connect the LED strip lights: clipping and using connectors, or clipping and using a cable with a connector.

6) If you choose to use connectors, make sure they are properly connected to the LED strip light and circuit board.

7) If you choose to use a cable with a connector, make sure it is properly connected to the LED strip light and circuit board.

8) If you choose to clip and solder the LED strip lights together, make sure the connection is tight and secure.

9) Protect the connecting position with some form of insulation (e.g. electrical tape).

The Power Supply issue you need to pay attention to :

  1. For 12V led lights power supply, The voltage will decrease more than 5m (16.4ft)
  2. For 24V led strip lights power supply, The voltage will decrease more than 10m (32.8 feet)
  3. If we want to connect two or more led light strips, You need to be ready for enough power supply!

The important thing you need to consider is the wattage of the power supply.

eg: assume you have an LED strip that draws about 24W of power. If we want to add another full-length strip, the total will be 48 watts and this needs special attention because there are many factors involved like length and brightness level which all affect how much energy is needed for your setup!

There’s no perfect solution here but I recommend getting at least 60 Watts from any device providing electricity as well as being aware of what kind (battery operated vs plug) so it doesn’t brick anything when moving around during performances etc…

How to connect led lights together with connector

There are different types of LED Strip connectors, so it is important to get the right type for your LED Strip. If you have a single-color LED Strip, then you need a connector with two copper pads. If you have an RGB LED Strip, then you need a connector with four copper pads.

Once you have the right connector, all you have to do is connect the copper pads on the LED Strip to the corresponding copper pads on the connector. Make sure that the polarity is correct, so that the positive and negative terminals are connected correctly.

As far as we know, there are three variants of connectors.

The first type of connector is a clamp style that clamps both the LED Strips together and covers them with a flip cover. With this style, the connection between two LED Strips will look seamless as if they were actually a single strip.

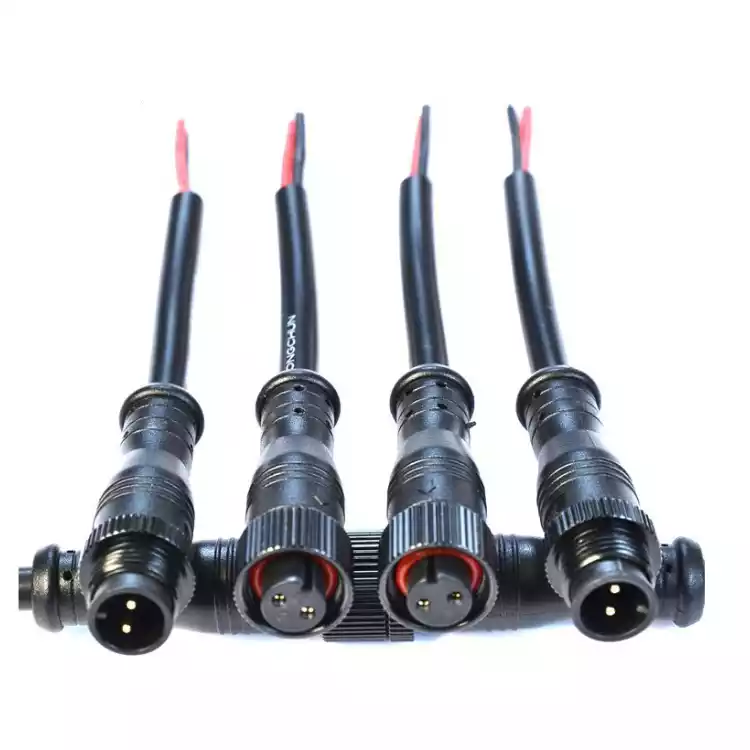
The second type of connector has pins on both sides and a small cable in the middle. This variant is extremely useful if you want to make angles with the LED Strips or avoid any obstacles.

The third type of connector has a connecting clip only one end of the cable while the other end is just exposed wire. This connector is useful at the starting (or ending) where you want to connect the strip with the power supply.

Led Strip Lights Connector Two Method

Simple Method 1: Clipping and connecting led lights together with connector

  1. Use LED Strip Lights Solderless Connector
  2. Be careful to push the led strip lights after cutting into the connector piece
  3. Close the connector if insert well

Simple Method 2: Clipping and connecting led strip lights together with a connector of the cable

  1. Use LED Light Strips Solderless Connector with cable
  2. Be careful to insert the led light strip after cutting into the connector piece
  3. Close the connector if insert well

How to connect led strips together without connectors

If you are not familiar with soldering or do not have the necessary tools/equipment and hands-on experience, we recommend using a connector cable.

Single LED Strip Lights

With a single LED strip, you have two pads: one for positive supply and another for negative. Make sure that both strips are connected to different parts of your circuit so they don’t short out!

RGB LED Strip Lights

If you have an RGB LED Strip and want to connect to another compatible RGB LED Strip, then you need to be a bit more careful. This is because, any typical RGB LED Strip will have four copper pads, in the same area as the two copper pads, which was the case with the single-color strip.

Since each color (red, green, blue) needs its own connection, it’s important to make sure that the copper pads on both strips are aligned. If they’re not aligned, then your LED Strip won’t light up.

Connect led strips together without connectors- Method

Professional Method 3: If you want to connect led strips together without connectors, then soldering is what’s needed.  Before soldering, check the polarity of the copper pads on the LED Strips.

Step 1: Clip the led strip lights to be connected together.

Step 2: Add solder to the LEDs on the end of each light strip.

Step 3: Solder the led taps to pin to pin.

Step 4: If all works well, it is complete!

If not, you can try again.

The method for soldering single color or RGB Led Strips is exactly the same. Check that your strips are compatible, align them correctly (and properly) on alder wood boards with copper pads, and then solder them together to make sure they work!

How Many LED Strips Can you Connect Together?

How many led strips can I connect together

1. Generally speaking, there is no limit to the number of LED strips that can be connected, but you should take into account the power supply. It may be necessary to change to a more powerful cable and connector, which is not easy for most people.

2. However, it is not recommended to connect too many LED strips. It is better to buy a long LED strip light as you wish because the power supply will be enough and there will be no other problems!


Can you cut addressable RGB strips? Easy Cutting Guide

Can you cut addressable RGB strips?  Easy Cutting Guide

Whether you’re looking to illuminate your kitchen cupboards or backlight your TV, with LED strip lights, there’s a solution to everything. Favored for their versatility, LED strips to consist of a series of LED emitters installed onto a narrow, flexible circuit board.

There’s just one cause for concern. Most LED strips come as long reels between 3ft and 16ft in length. Will they continue to work if they are trimmed down?

Yes, LED strip lights will carry on working after they’ve been cut as long as you cut along the designated lines. LED strips are made up of several individual circuits, so each cut line demarcates the end of one circuit and the start of a new one. Cutting elsewhere on the LED strip will cause that circuit, and potentially the whole strip, to cease working. MSHLED Strip Light is one example of a high-quality LED light that can be cut without damaging the circuitry.

So, if you need to customize the length of your LED strip lights, simply find the cut lines and make your cuts accordingly. With careful trimming, you can create the perfect lighting solution for any space.

1. What you’ll need

When you’re ready to cut your addressable RGB strip, there are a few things you’ll need to have on hand.

First, you’ll need a sharp knife or scissors.

Second, you’ll need a ruler or tape measure to make sure you’re cutting the strip in a straight line.

Finally, you’ll need something to catch the excess RGB LEDs – we recommend using a piece of cardboard or a paper plate.

Once you have all of your materials, follow these steps to cut your addressable RGB strip: 1) Measure and mark the spot where you want to make your cut. 2) Use your sharp knife or scissors to carefully make a straight cut along the marked line. 3) Hold onto the end of the strip that you just cut, and allow the excess LEDs to fall onto your cardboard or paper plate. 4) Discard the excess LEDs and enjoy your new custom-length RGB LED strip!

2. How to cut an LED strip

LED strips are a great way to add accent lighting to any space, and they’re relatively easy to install. However, cutting an LED strip can be a bit tricky, as you need to be careful not to damage the individual LEDs. Here’s a step-by-step guide on how to cut an LED strip:

1. Measure the length of the LED strip you need and mark the spot where you want to make the cut.

2. Using a sharp knife or pair of scissors, carefully cut the strip at the marked spot.

3. Once the strip is cut, you’ll need to Soldier or heat shrink the exposed wires to prevent them from shorting out.

4. That’s it! You can now install your LED strip in its desired location.

3. If you make a mistake

If you’re cutting your own MSHLED strip light, it’s important to be careful and make sure you don’t make any mistakes. Otherwise, you could end up damaging the LEDs or causing other problems. Here are a few tips to help you avoid making mistakes when cutting MSHLED strip lights:

First, always use sharp scissors or a sharp knife when cutting the strip light. This will help you get a clean cut and avoid damaging the LEDs.

Second, make sure you measure the strip light carefully before cutting it. It’s important to get the measurements right so that you don’t end up with too much or too little light.

Third, if possible, use a guide to help you make straight cuts. This will again help you avoid damaging the LEDs.

Finally, once you’ve made your cuts, test the lights to make sure they’re working properly.

Following these tips should help you avoid making mistakes when cutting MSHLED strip lights.

4. Common mistakes people make when cutting LED strips

If you’re looking to add some extra lighting to your home, LED strips are a great option. They’re easy to install and can be used in a variety of ways, from under-cabinet lighting to accent lighting. However, there are a few common mistakes people make when cutting LED strips.

One mistake is cutting the strip too short. When you cut an LED strip, you need to leave about an inch of the extra strip at each end. This ensures that you’ll have enough strips to connect to the power source and makes it easier to hide any exposed wires.

Another mistake is cutting the strip at an angle. When you cut the strip, the cut should be perpendicular to the flat edge of the strip. This ensures that the exposed wires will be facing downwards, making them less visible and less likely to be damaged.

Finally, some people make the mistake of not sealing the exposed wires. When you cut an LED strip, the exposed wires can be susceptible to water damage and short-circuiting. To protect the wires, simply apply a small amount of heat-shrink tubing or electrical tape over them.

By following these simple tips, you can avoid common mistakes and get the most out of your LED strips.

DIY: How to Solder LED Strips

Solderless connectors are the easiest way to connect LED strips, but if you’re looking for a more permanent connection, soldering is the way to go. Soldering is a simple process that anyone can do, and it only takes a few minutes. Here’s a step-by-step guide on how to solder LED strips:

1. Start by stripping about ½ inch of the insulation off the end of the strip light.

2. Next, tin the wires by applying a small amount of solder to them. This will help the wires stay in place and makes it easier to solder them together.

3. Now, twist the positive (red) wires together and solder them in place. Then, do the same for the negative (black) wires.

4. Once the wires are soldered together, trim any excess wire and apply a small amount of heat-shrink tubing over the connection.

5. That’s it! Your LED strip is now soldered and ready to be installed.

6. Tips for soldering LED strips

If you’re going to be soldering LED strips, there are a few things you need to keep in mind.

First, always use lead-free solder when working with electronics. Lead-free solder is safe and won’t damage the LED strips.

Second, it’s important to use a clean, flat surface when soldering. This will help you avoid making any mistakes.

Finally, make sure you have all the necessary tools before you start soldering. You’ll need a soldering iron, some lead-free solder, and some heat-shrink tubing.

By following these simple tips, you can Solder your LED strips like a pro!

How to install LED strip lights

Installing LED strip lights is a simple process that anyone can do. There are a few things you need to keep in mind, though. First, make sure you have all the necessary tools and materials. You’ll need a power supply, LED strip lights, soldering iron, solder, and heat-shrink tubing.

Second, it’s important to read the instructions that come with your LED strips. This will help you avoid making any mistakes.

Third, when installing the LED strips, make sure you leave about an inch of extra strip at each end. This ensures that you’ll have enough strip to connect to the power source and makes it easier to hide any exposed wires.

Finally, when cutting the LED strips, be sure to cut them at a perpendicular angle to the flat edge of the strip. This ensures that the exposed wires will be facing downwards, making them less visible and less likely to be damaged.

By following these simple tips, you can install LED strip lights like a pro!


5. Final thoughts

LED strips are becoming more and more popular due to their versatility and low cost. But many people don’t know how to cut them properly, which can lead to damaged strips or shortened lifespans. In this guide, we’ll show you how to easily cut LED strips without damaging them, as well as common mistakes people make when cutting LED strips.

But what if you don’t need a whole reel? If you want to trim down an LED strip light, it’s important to know how. Our team at MSHLED is here to help. Contact us today for all of your LED lighting needs – we have everything from addressable RGB strips to single-color LEDs. We guarantee that we have the perfect solution for your next project!

car light

How to Install LED Lights in A car -car warning light

Adding automotive LED light strips to the interior and exterior of your vehicle can make it appear as if it came directly from the Fast and Furious franchise. These lovely, long-lasting lights bring a splash of color to the sidewalk beneath your car. They can also illuminate base areas and tree trunks, making it easier to see what’s inside.


Because LED lights are known for their low energy use, these 12V automotive LED light bars will not affect the power consumption of your vehicle. LED lights may save you a lot of time, whether you want to make a statement on the road or merely want to find sunglasses and groceries in your car more quickly.


What LED Light Bars Should You Purchase?

Some important considerations to make while selecting the best-LED light bar for your needs.


Do you require LED strips for indoor, outdoor, or automotive applications?

Do you desire strips that come in a variety of colors and lighting patterns?

Do you want to be able to adjust the brightness?

Do you want the light to respond to music?

Do you require a specific LED strip length?

LED strips are also available at a range of prices, allowing you to achieve the desired aesthetic effect while staying within your budget.


Always take measurements before purchasing LED strips to make your project go more quickly and smoothly. MSHLighting can also handle the cutting and welding for you; get a quote today!


If you like the effects of your LED light bar, you might want to look into the many alternative non-light bars LED lighting solutions for your car, which come with free installation guidelines. -Customer


Some tips before installing led strip light to the car 

  1. Clean the place before installing the strip
  2. Heat the adhesive tape with a hair drier before applying it for a greater adhesive effect.


The installation strip steps for the car.

  1. Remove the rear self-adhesive and wrap the strip light around the border of the door.
  2. Pry the door light cover open, then disconnect the connector.
  3. Hide the wire by pulling it to the position of the car door light.
  4. Connect the wires, with the red wire representing positive polarity (+) and the black wire representing negative polarity (-). (-).
  5. Finish by installing the light cover.

car light

How to compare Addressable RGB LED Light Strips WS2811, WS2812B, WS2813, WS2815, SK6812,   APA102C 

Today I am comparing the different normal addressable led strips, talking about their technical specifications, then I’m gonna help you figure out which one is the best-led strip lights for your project.

5V Addressable Strip

WS2812b led strip lights

The most well-known chip currently is the ws2812b chip. This chip became very famous partly because Adafruit gave it the name “Neopixels” and made it available to the general public a few years ago.

It can do 30LEDs/M, 60LEDs/M, 144LEDs/m. Black and White PCB.

One Pixel with One LED, each LED can be cut. Detail as below, It with all WIFI controllers and Offline controllers.

WS2812B LED Strip

Ws2813 led strip

Refresh Frequency updates reach 2 KHz, 5v compatible, and dual signal wires so that if one led gets damaged, the signal should still transfer to all other chips. (almost same with ws2815, but voltage different).

 Any led broken will not affect another led unless two consecutive LEDs are broken.

30LEDs/M, 60LEDs/M,144LEDs/M.

PN Working current Working temperature Package LED number Viewing angle Lifespan Working voltage Pixel/M
S010030-WS2813RGB 1.8A/meter -40℃~60℃ 5meter/roll 30pcs/meter 140 50000h DC 5V 30Pixels/M
S010060-WS2813RGB 3.6A/meter -40℃~60℃ 5meter/roll 60pcs/meter 140 50000h DC 5V 60Pixels/M
S012144-WS2813RGB 8.64A/meter -40℃~60℃ 2meter/roll 144pcs/meter 140 50000h DC 5V 144Pixels/m

SK6812 RGBW LED Strip

 This chip runs PWM at about 1.2kHz making it better in the regard to the ws2812b too, and Adafruit used it the same with ws2812b. It does RGBW mostly.


APA102C (SPI) LED Strip

APA102 PWM Frequency is 19khz

 It also isn’t a clockless chip with only three wires (+, -, data) but instead uses a 4 wire protocol (+, -, clock, data). The APA102 also has some advantages in regards to settable brightness and tune-able color spectrums. APA102 is also the brightest LED strip before, so if you need a lot of light output, this might be your LED chip! The APA102 can also be bought in full white variants giving you for instance warm white addressable LED strips.


SMD2020 APA102C and SMD5050 APA102C for your choice.

1)SMD2020 APA102C 200leds/m, 288leds/m, 

2) SMD2020 APA102C, 72leds/PC, 227cm length customize.

apa102c led strip

3)SMD5050, APA102C, 30LEDs/M, 60LEDs/M, 144LEDs/M. Black and White PCB.

apa102c led strip

12V strip light

WS2815 led strip

A new chip from the creators of the WS2812B and compatible with the same protocol. The main improvements are a higher internal PWM frequency (around 2kHz), 12v compatible (5v logic signal), and dual signal wires (DI, BI, GND, 12V), so that if a chip gets damaged the signal should still reach all other chips. This causes ws2815 to use more watts than a ws2812b running the same pattern.

WS2815 LED Strip

WS2811 LED Strip 

It is the cheapest addressable led strip, It is one signal cable, three cables (GND, DAT, 12V/24V), The voltage 12V/24V both available. RGBW and RGB color for more choice.

WS2811 IC uses pixel light and Amusement Pixel light widely.

ws2811 strip


3d led pixel ball curtain

DMX 3D LED Project

It is a DMX 3d led ball project. with two-sided light effects can be seen from 360 degrees for unique and vivid effects. The constant current driver being designed on double size, which contributes to the protection of LEDs’ lifespan. DMX512 Protocol, sharing long-distance transmission and high ability of anti-interference. Light and audio controlled synchronously, music controllable. Environment friendly, no harsh glare, and buzzing noise, no flicker. Any DMX Controller compatible, DMX led lighting control solution. We use solid capacitors, make the led more stable, the lifespan is over 50000h. We have a short circuit, over current, over-temperature protection design. The efficient power management makes our LED save 40% power. The 3d ball lights are DC24V, this makes the led color more stable. The 3d ball is controlled by a DMX controller and software. The software is a center of light, the software outputs signals to the DMX controller, and the controller transforms the sign into tubes. It can change the color and movement of the tube. With 4000pcs 3d pixel ball light, make a curtain vivid. With Madrix to do programming.  
ws2812b mini led strip

Mullinsen, Liard, Chou Ming and others entered the list of 500, and Debon and Hangke launched filament lamps.

01
Mullins, Liard, and Chau Ming join together in the New Economy Enterprise 500!
On November 28th, the “Top 500 New Economy Enterprises in China 2020” list was released in Hangzhou. On November 28th, “2020 China’s Top 500 New Economy Enterprises” was released in Hangzhou.

▲The press conference
The “China’s Top 500 New Economy Enterprises” competition selects the market/valuation as the main index for the evaluation of the top 500 new economy enterprises and revises the market/valuation based on six categories of enterprise-scale, growth rate, profitability, technology-driven, talent and employment, and nine sub-categories of public opinion as the revision indexes to finally produce the list of China’s top 500 new economy enterprises.
According to the list, advanced manufacturing is the most dominant industry in the New Economy 500, with 256 companies.
Among them, BOE, TCL, Da Clan Laser, Dongshan Precision, Konka, Woodlinson, Lazard, and Chou Ming are all on the list.

02
Together we win! Depot Lighting Signs Strategic Cooperation Agreement with Hangke Optoelectronics

Ltd. and Hangke Optoelectronics Group Co., Ltd. strategic cooperation signing ceremony were held in the import and export company of Desbon. Mr. Li Qiang, Vice General Manager of Depp on Lighting, and Mr. Yan Qianjun, Chairman of Hangke Optoelectronics, signed a strategic cooperation agreement on behalf of the two parties to cooperate on LED filament lamp products and to focus on the development of filament lamp products and markets by pooling their resources.

As a leading enterprise in China’s lighting industry, Deppon Lighting has been working with nearly 500 importers, distributors, and distributors in more than 80 countries and regions around the world for more than 20 years with the advantages of “technology development + professional manufacturing” and the service concept of “customer satisfaction first”. In the domestic market, we have established a nationwide network of offline dealers, direct strategic customer channels, and online e-commerce platform channels, and have accumulated a wide range of customer groups and established an excellent brand image. Over the years, the company’s overall strength has been ranked among the top ten in the industry, and the export of LED lighting products has been among the top three in the industry for many years.
The two sides will work together to establish a close strategic partnership, which will combine the R&D, brand, customer resources, and global marketing advantages of Depp on and the industry chain layout and manufacturing advantages of Hangke in niche areas, and give full play to the advantages of both sides to develop two-way empowerment, so as to form the core competitiveness of LED filament lamp category in terms of scale and differentiation, and provide better filament lamp solutions for global customers, which will not only help strengthen Deppon’s position as a leading enterprise in the lighting industry but also greatly promote Hangke’s growth into a leading enterprise in the global market in the field of filament lamp and achieve a mutually beneficial and win-win development.

03
Zhou Ming raised 880 million yuan to push Daya Bay LED display intelligent production line construction and other projects

Recently, CHARMING disclosed the prospectus for the issuance of shares in the Growth Enterprise Market to specific targets. The issuance to the specific target is domestic listed RMB ordinary shares (A shares). The issue of fund-raising does not exceed 88,350.00 million yuan (including), after deducting the issue expenses, the net amount of fund-raising all invested in the following projects.

Chau Ming Technology said that the purpose of the stock issue is: first, to promote the company’s development strategy, consolidate and improve the industry position; second, to expand production scale, to solve the problem of LED display production capacity shortage.
Among them, the fundraised for the construction project of LED display intelligent production line in Daya Bay of Zhouming Science and Technology is 570,800,000 Yuan, with a total investment of 95,984,200 Yuan. Continuity Technology intends to use advanced automatic production line, automatic logistics line and intelligent warehousing, etc., to establish a group LED display intelligent manufacturing base in Daya Bay, producing small pitch LED display, Mini LED display.